Company that rebuilds "rusted" Jeep (TJ) Frame Rails, etc!

Ryan Kidder

New member
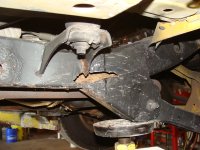
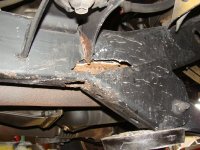
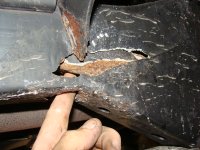
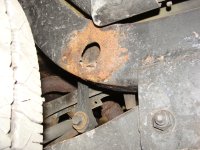
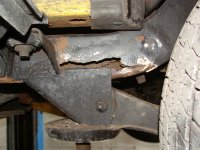
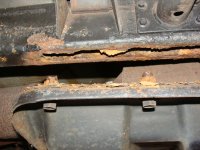
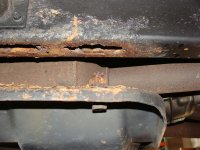
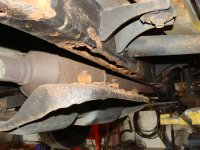
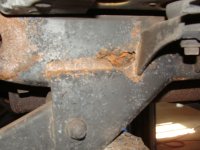
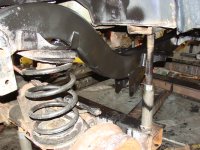
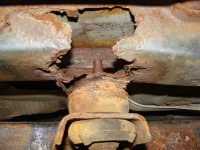
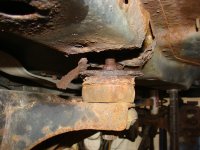
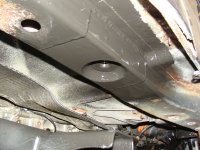
For those who have a Jeep frame (and structural under-body) rot problem (most typically the TJ’s), there is now a solution for those who don’t want to "junk" their Jeep!

A company now exists (in Avon, Indiana) which specializes in fixing the typical rust problems on vehicles (mainly Jeeps)! Although the prices are dependent on what all needs fixed; even the cost of all the "typical" repairs together are usually worth the investment (as those total costs would generally be less than half the price of a replacement "same year" Jeep, and ALL repairs are guaranteed for the life of the vehicle).

...that means a replacement frame section is guaranteed to NEVER rot out again!

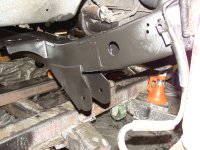
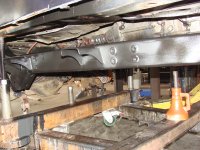
-These rails are designed to interlock into the existing factory sections (front & rear), and are Tig welded (100% penetration) to join the sections!

The new rail sections were designed to eliminate the unneeded (factory) holes, but have added drain holes (within the front and rear "lower control arm frame brackets" to let the elements out!

-The skid plate frame "rivet nuts" are eliminated & instead replaced with weld-in style nut-assemblies which cannot fall out of the frame (even if for some near-impossible reason they ever came loose)!

-The side step frame "rivet nuts" are also eliminated and now replaced with another style weld-in nut so it doesn't spin loose if ever attempting to remove the bolts in the future, or to allow rust to form under them!

-All replacement sections are blasted, acid etched, and rustproofed (inside & out) with an extremely durable coating that is nearly as tough as the steel it is covering!

---------------------------------------
[[This coating isn't like a typical paint, as most "other" coatings mainly just "mechanically bond" to an objects outer surface.


To learn more, go to POR-15 Technical Information

Though, this is a professional coating/system which requires a certain level of expertise to make sure the process is effective. and those details will be covered in Post #6 (below) titled "Jeep Frame/Body-Rail Restoration (Por15 Process explained)"]]
---------------------------------------

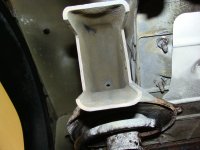
That process extends at least 6” into the remaining factory “front” frame section, and extends at least 12” into the factory “rear” frame section! Though, the insides of the factory (remaining) sections are blasted/etched/coated as far as reachable (from the "cut" openings).


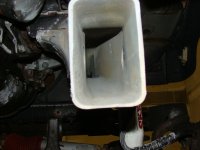
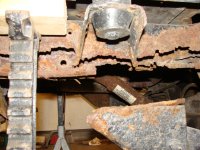
Pics show inside of frames after blasting & etching
0001 -.JPG

001 -.JPG


___
The rustproofing process can extend further for an additional cost, or can be completed by the owner to save money.
The coating can also be touched up by the owner assuming it ever gets damaged (sliding on rocks, etc).

------
Jeep owners from out-of-state who have no way of transporting their Jeep in for repair can have it shipped (through a broker) for typically between $500-$750.


“Prices” for some of these services can be found below in post #5…
------

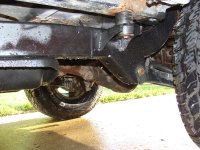
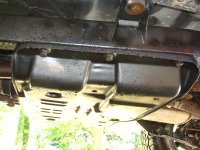
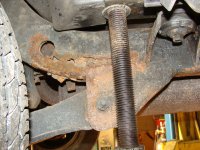
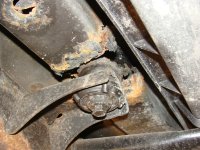
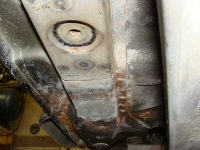
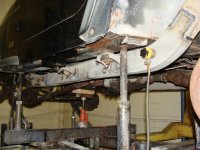
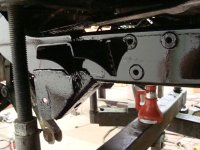
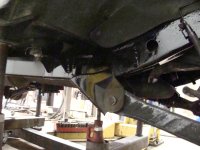
Below are some pics of past Jeep frame and body rail repairs (before & after)...

Thanks!

Ryan Kidder/ Owner
Innovative Product Fabrication & Welding, LLC


-------
Those who have questions or comments should post below...

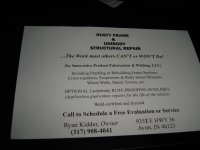
Those who are interested in these services can either call the number on the business post-card (in the last pic), or send a private message through the forums to trade contact info!


Call anytime between 10:00a - 10:00p, 7 days a week.
Business is currently “by appointment only”.
-------


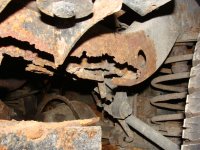
2000 Jeep Wrangler (Severe Mid-Lower Frame Rot)
01.JPG

02.JPG


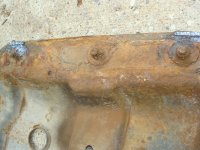
Notice the cut welds where the skid plate was welded to the frame... That is a typical sign that the Frame "Rivet Nuts" either started coming loose or had previously ripped out of the frame, and was an attempt to temporarily fix the problem.
03.JPG

04.JPG


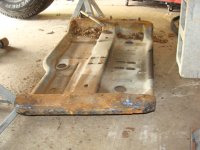
The customer also requested that the Skid Plate be restored as well. In this pic, it had been blasted and acid-etched (phosphatized)
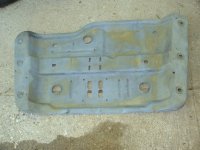
05.JPG


Fitting up the coated Skid Plate to the rebuilt frame
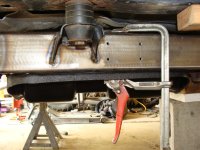
06.JPG


"Acid-etched" completed frame ready for coating
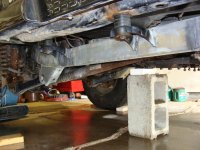
07.JPG


Frame & Skid Plate Rustproofed
08.JPG

09.JPG


1999 Jeep Wrangler (Moderate Mid-Lower Frame Rot)
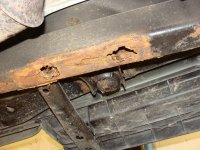
10.JPG

11.JPG


Body Rail Rot (Middle Mount)
12.JPG


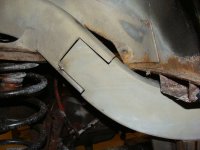
C-Notched Fit-up of "old" to "new" sections
13.JPG


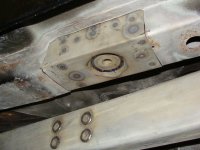
Rebuilt "body-rail mount" fit-up & ready to be welded into place
15.JPG

16.JPG


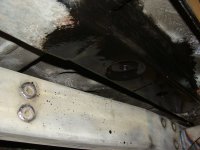
Rebuilt "body-rail mount" rustproofed
17.JPG


Replacement frame welded into place
14.JPG


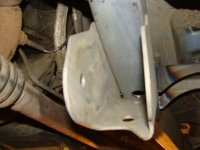
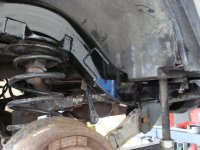
Added Frame Drain Hole (shown in "front" Lower Trailing Arm Mount Bracket)
18.JPG


Frame freshly coated (inside & out)
19.JPG

20.JPG

21.JPG


Business info
22.JPG
Call anytime between 10:00a-10:00p [Eastern Time] (7 days a week)
Business is currently "By Appointment Only"
 
Last edited:

Can I just bring in the frame or do I need to bring in the whole Jeep?

Sent from my SAMSUNG-SM-G900A using Tapatalk
 
Bringing just the frame in would be fine. Some jobs are easier (and usually cheaper) to complete with the frame disconnected from the body...
 
Jeeps generally have a high-resale value, but can be hard to get that if it is all rusted out! Since Jeep frames typically rust from the inside out (mainly because of no factory drain holes in the center section), it can be difficult to know how bad the inner part of the frame is until some testing can be done. I have personally removed over 50 lbs of debris (rust, rocks, dirt/mud, etc.) from frames when cutting rotted sections out, so it is no wonder to me why these frames rust out so fast.

With that said, the "no factory drain-hole" issue is just part of the equation...and there are a few other things that can speed up the rotting process!

One big issue (in cold weather states) is the road salt, which builds up (concentrates) in the frames as the years go by, and speeds up the rusting process exponentially in time. Washing out a factory frame after exposure to those salts is recommended, but is difficult to flush out those salts along with that added water without drain holes... So, adding drain holes (as close to the lower trailing arm mounts as possible) would usually be smart, but "might" cause an issue if the hole is either made too big or too small. If the hole is too big, and if the frame structure is too compromised to handle any metal being removed from that section, then it could cause premature failure (cracking/breakage). If the hole is too small, and if there is a lot of larger debris in the frame, then it might take some time & effort to remove most of that, though some of the pieces (sheets of rust from the inside of the rail) can keep covering the holes and prevent efficient drainage. But, if there is that much rust in the inner rail, then structure is probably an issue...and the frame should be checked out for structural integrity.

If a Jeep was usually parked on an incline (steep driveway), then the rear part of the lower center frame section could be the first area/s to eventually be compromised (as gravity makes the water settle in the tube at the rear bend just ahead of the rear axle during that time). But, if the Jeep was always parked on a level surface, then the entire center lower section will likely eventually go bad around the same time.

Another cause for severe frame rot is painting/coating (undercoating) a frame that is already rusting, as that traps “moisture/salt, etc.” under the coating...and will rust the metal at record speeds. That mistake can quickly change a frame from one that could have been restored eventually to a frame that is complete junk. There is incomplete information spreading around that if metal starts rusting, you need to coat it as quickly as possible (stems from the truth, but the rust MUST be thoroughly neutralized beforehand). Though, the reason most people will spray over a rusty frame is for aesthetic purposes (to improve the appearance for personal reasons, or to "sell" it). When purchasing a vehicle, always be weary of a frame on an older vehicle (10+ years old) that looks freshly painted (and/or has bubbles under the coating, etc), as those are the most typical Jeeps I get in for repair! The most popular phrase I hear is: "Well, I "just bought this Jeep, and...".


-----
[One of my past consultations involved someone who bought her Jeep from a used car dealership...and they actually used Bondo (body filler) to make the frame "appear" to be in good solid condition before undercoating it. She found out shortly after purchase when backing out of her driveway, when the transmission skid plate dropped down (bolts ripped out of the frame). The middle frame rails (both sides) were completely rotted and would have needed rebuilt]. [[Pics (and explanations) posted below]]
-----

If you own a Jeep that had paint/undercoating sprayed on rusting surfaces, and the rust hadn’t been neutralized first (signs of that “over time” would be bubbling/peeling); then removing that coating as quickly as possible would likely be a wise decision (assuming the “base metal” is still structurally sound and worth putting time into). A 4000psi+ pressure washer and a turbo nozzle might be the easiest way to remove most/all of that coating, while a Needle Scaler (air tool) might help finish removing the stubborn parts after aggressive Pressure Washing.

(Following coating removal), using the POR15 process (covered in Post #6) might be wise, but a “full” factory (TJ) frame restoration (of the middle lower section) will likely not be possible, and will just help prolong the life of those center rail sections (more details in Post #6). “Though, if the front & rear sections are still structurally sound, and you eventually plan to have the mid-lower center rails rebuilt”; then concentrating on the front & rear clips of the frame would be wise (to the “start/stop” points of the replacement rails), as the frame-rebuilding process (as previously mentioned/shown) will include blasting the inside of the majority of those existing frame rails.


-There are a few (production) options out there to "patch" damaged/missing areas on Jeep frames, but rely on there being enough "solid frame" left to weld them onto. So, (in a nutshell) those patches are only as good as the base metal they are attaching to...and it can be somewhat of a challenge knowing what is solid and what is half-gone...

The recommended places to test (first) would be the entire bottom part of the center rail section (especially around the perimeter of where the skid plate mounts to the frame), around the perimeter of the front-lower trailing arm mount, and also around the rear "upper & lower" trailing arm mounts. The rear-upper trailing arm mounts will typically start to fall into a weakened frame (bust through the side-wall they are welded to).

-You can possibly do a "knock" test (with a hammer), but it can take a keen sense of hearing to tell what is truly solid and what isn't. 1/16" metal "might" sound solid to the average person, but isn't enough to make a TJ frame structurally sound.

-A “Needle Scaler” (air tool which can be purchased at Harbour Freight for roughly between $30-$60 [depending on the model]) can also be used, though a capable air compressor would be needed to run the tool, and safety glasses/goggles & ear protection would be recommended. Even though those air tools are usually rated @ 90 psi, they really need a higher pressure to effectively test the frame. So, run the Needle Scaler @ 135 psi, and relatively firmly press the needles against the frame (while slowly moving around) in the rusted areas until you can see clean metal being exposed. If the metal is only 1/16" thick or less, the frame will typically dent-in or punch through. If it is 1/8" or more, it will not damage the frames structural integrity, but will sound different compared to the thicker areas.

-Though, the most effective way is to drill 1/8" to 1/4" (diameter) holes in suspect areas to see exactly how thick those areas are…and can follow descaling if necessary.

Factory YJ frame tubes are supposed to have roughly a 1/8" wall thickness, while factory TJ frame tubes are supposed to have roughly a 3/16" wall thickness.

If the front & rear sections of the frame are still structurally sound, then it is usually more cost effective to rebuild the center sections! But if the entire frame is fully rotted out (because painting/undercoating was applied over a salt-coated, rusty frame several years before, etc), then either "swapping out the frame", "selling as-is", or "junking the vehicle" might be the only other options.

{Though, make sure the rest of the frame is truly rotted before jumping to that conclusion, as looks "might" be deceiving as far as the actual condition of the existing frame is concerned. There have been times where the existing sections appeared to be rotted, but took either cutting or drilling into the frame for it to become clear that there was in fact enough metal left to safely attach the new sections to.}

For those who aren't able to confirm the structural integrity of their Jeep frame/s, I offer free consultations (but the vehicle/frame will need to be brought to my shop for a thorough examination). The owner is welcome to observe this entire process, as the testing will be done immediately upon arrival.

------------------------------------------------------------------------------------------------------------------------------------------
I typically see the TJ Jeeps come into my shop, as they seem to be the most sought out model of used Jeeps in the market today. Although there are many variables to consider, it is “my” belief that TJ Jeeps (on average) can go for $7,000 to $8,500 (assuming the frame & body are in "good" to "great" condition, and everything is factory...meaning no expensive aftermarket parts).

But, TJ’s with compromised frames (though the front & rear sections are still “structurally sound”) aren’t worth more than roughly $4,500 to $5,000 (assuming everything is factory and the body is in "good" to "great" condition).

And, the same TJ Jeep with a fully compromised frame isn’t worth more than $2,500 to $3,000 (again assuming the body is in good condition and everything is factory).

...The statement in the first paragraph above is based on the average prices I've seen & heard the TJ Jeeps go for in the state of Indiana (and surrounding cold-weather states).

...The opinions above in the 2nd & 3rd paragraphs are based on the average cost it would be to fix a TJ Jeep in those current conditions to get them to a safe operating state, and to return them to "good" to "great" condition.
------------------------------------------------------------------------------------------------------------------------------------------


The pics below are of the consultation (explained above) that had body filler applied to the frame to cover up the damage, and shows what some are willing to do to sell a vehicle.
-------------

-Pics 01 thru 03 are of a section that “appeared” to be structurally sound, but running a scaler (scale-removing air-tool) knocked the water-proof Bondo (body filler) out of its place in the frame.
-50.JPG

51.JPG

52.JPG

-Pic 04 also appeared to be fully intact until that area was tested. Notice this large factory hole, as the next pic will show where body filler was applied over that hole on the other side…
53.JPG


-Pic 05 is a larger area that was completely covered with bondo, and still has certain areas that are filling the inside of the frame. Notice the factory hole that is covered up… The uneven surface under the coating was a clear sign that the frame was covered up with a non-metal substance prior to coating.
54.JPG


-Pics 06 thru 08 are what happened when the skid plate dropped down. Notice the rusted (splintered) skid-plate rivet nuts are still attached to the bolts… That area looked relatively solid at a glance "before failure".
55.JPG

56.JPG

57.JPG


-Pic 09 shows just how much debris can eventually built up in Jeep frames over time.
58.JPG
 
Last edited:

Rusted Jeep Frame/Body Rail Repair (A Few Prices)

For the typical rust problems on Jeeps that I see come into the shop, here are some of the costs for those corresponding services.

(Note: These prices do not include replacement Rubber Body Mounts/Hardware that "might" need replaced.)


Details of the process (what all is included) is explained in the previous posts.

------
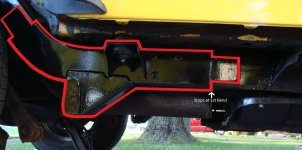
For a Jeep frame which has just the rear lower bends (of the center rail section) extending to the 1st rear bend rotted, the price would be roughly $900/side. The remaining (factory) ends "MUST" be structurally sound for that limited section to be installed.


[Note: That price would also assume the factory brackets are still intact & structurally sound, as they would typically be restored and reattached. Otherwise, aftermarket brackets can be used instead, but would be at an extra cost (assuming they weren't supplied by the customer].

...that repair is generally for the "few" Jeeps that were regularly parked on steep inclines.
Rear Quarter 01 (Cropped) -.jpg


------------------------------------------------------------------------------------------------------------

For "full" Mid-Lower Rail Section Replacements, the price would be $1,800/side ($3,400 if both sides are completed at the same time).

[Note: Price would also assume the factory brackets are still in tact & structurally sound, as they would typically be restored and reattached. Otherwise, aftermarket brackets can be used instead, but would be at an extra cost (assuming they weren't supplied by the customer].
Full Frame 01.JPG

Full Frame 02.JPG

Full Frame 03.JPG


------------------------------------------------------------------------------------------------------------
For Jeeps which have Body Rail Rot (typically the "center" mount), the price to restore those are $250/side
01.JPG

02.JPG

03.JPG


(At this time) All other possible rust repairs will need to be quoted on a case by case basis on site.


Business Info
22.JPG

Call anytime between 10:00a-10:00p [Eastern Time] (7 days a week)
 
Last edited:
Jeep Frame/Body-Rail Restoration (Por15 Process explained)

Of all the coatings I have used in the past, I will say that Por15 has the best system when the goal is to stop rust and prevent it from coming back!

With that said, the system must be used properly, and the metal needs to be thoroughly prepped to have effective results….

[[Note: this article is compiled solely by me, and is based “not only” on the info that is posted on the POR15 website, but from many years of personal experience with using the POR15 product line. So, the info in this post is not necessarily the opinions of the POR15 Company]]


Though, here are the links to the instructions (Data Sheets) posted on the POR15 website

http://qr.absolutecoatings.com/QR-assets/downloads/POR15/POR15-Description.pdf
http://qr.absolutecoatings.com/QR-assets/downloads/POR15/POR-15_TD-RustPreventive.pdf


The POR15 Company sells to the general public, but I found that it takes a certain level of knowledge & skill to effectively apply the coating, or poor results Can & usually Will result!


Now, I’ve heard rumors of complaints of past users of POR15, and comments that the coating doesn’t stand up to its claims. BUT, it is extremely easy to miss a step or two of the entire process…especially if someone doesn’t understand how the system works.


-------------------------------------------------------------------------
Por15 is a 3 (possibly 4) part system:
1. The cleaner: http://www.por15.com/POR-15-Cleaner-Degreaser_p_14.html
2. The acid: http://www.por15.com/POR-15-Metal-Prep_p_15.html
3. The Rust Preventative Coating: http://www.por15.com/POR-15_Rust_Preventive_Coating


4. A Top Coat: http://www.por15.com/POR-15-Top-Coat_p_102.html "might" need applied if the coating will be exposed to direct sunlight, as the Base Coat is not UV stable.
--------------------------------------------------------------------------

- “POR15 Rust Preventative Coating” is "Moisture Cured", so that means “If” you get it on your skin (and don’t remove it with the proper solvent within a very short time), it will “cure”...and will be bonded to your skin until it wears off! So, wearing fully protective gear is highly recommended.


-“ALL” rust scale must be removed (on all surfaces to be etched/coated), or the rusting WILL continue between it & the base metal. Some scale I’ve removed was so well adhered to the base metal that it took either multiple passes with a Needle Scaler, Air Hammer, Chipping Hammer, or with extremely aggressive Blasting to thoroughly remove it! If rust scale is that well adhered, then even soaking the metal in the etching acid (even for an extended period of time) will not typically let the chemical get under the scale.

[[I’ve done tests where I’ve submerged parts (with heavy rust scale) in the POR15 Metal Prep (etching acid) for anywhere between several days to over a week. And immediately upon removing the parts from the tank (without rinsing or drying them) I chipped off the scale and found that the freshly exposed surface (under the scale) was dry as a bone.]]

So, attempting to use this system on a "Rotting" mid-lower (factory) Jeep frame rail will probably not be a permanent fix, as there will typically be a lot of extremely well adhered scale on the inside surfaces. Therefore, it’s likely that the factory center mid frame section will completely rot out eventually regardless of what is sprayed on the inside of the rail.

Now, the POR15 Company claims that you can apply this system to a rusty surface after all scale is removed, BUT I’ve come to the conclusion that “if” the bare, rusting metal had been exposed to road salt for many years (and the metal has deep pits in it), then it really needs to be thoroughly blasted first, then cleaned with the POR15 Cleaner/Degreaser, and then acid-etched with the POR15 Metal Prep for a prolonged period (to assure that the rust has been thoroughly neutralized.


…Though, (if blasting is not a possibility) then applying the POR15 Cleaner/Degreaser over the rusted surface and scrubbing the area with a wire brush would be smart “before rinsing”, and repeating that process if the “Marine-Clean suds” appear dirty after scrubbing is performed. ...wearing safety goggles/respirator/protective clothing for this step would also be smart, as the metal bristles can flick fine particles of the Cleaner/Degreaser into the air and on/into your skin/eyes…and shouldn’t be inhaled either!


The Por15 Company is also rather vague on how long the POR15 Metal Prep (etching acid) needs to sit on rusted metal, because that can be a complete variable. A lightly-rusted surface will take a fraction of the time to thoroughly etch compared to that of a deeply rusted surface. And, if there are deep pits filled with rust/contaminants, then the acid can’t effectively do its job because of all that junk can be blocking it from the base metal. So, (in a nutshell) I’ve found (regardless of salt exposure) that the more rust/contaminants you can remove (before acid etching), the better the chance of successfully etching the metal and having a permanent fix.

During the etching process, once the metal is sprayed with the POR15 Metal Prep (etching acid), the metal “Must” stay wet the entire time with that acid until it is thoroughly rinsed off with water. Otherwise, the acid will dry and leave a film that can prevent bonding of the coating! If this occurs, re-spraying the metal with the etching acid and thoroughly scrubbing the previously dried areas with a stainless steel wire brush would be one way (other than sandblasting the surface & starting over) to remove that film. It may take several applications of extra acid during the scrubbing process to remove that residue while preventing the acid from drying again, and can end up being countless times more work to properly complete that step. So, that’s why it is very important to make sure the acid doesn’t dry out on the metal surface in the first place!

[[Though, it certainly won’t hurt to scrub the metal with a stainless wire brush when the metal is wet with the acid, as that can help assure that the metal is clean of contaminants so the acid can do its job]] ...wearing safety goggles/respirator/protective clothing for this step would be extremely wise, as the metal bristles can flick fine particles of the etching acid into the air and on/into your skin/eyes.
..and shouldn’t be inhaled either!


-Once cleaned, etched, & rinsed (preferably with warm/hot water), the surface should be dried as quickly as possible, and “Must” be completely dry before coating. A pressure washer is also effective at washing off the acid from the metal, and using a clean-burning torch or other heat source to guarantee dryness might be necessary (especially where metal panels are overlapping).


Common sense is required when heating panels with a torch, as “care” should be taken to make sure the metal does not get too hot (and possibly burn paint, carpet, etc on the other side of that panel), or the heat source doesn’t ignite gas fumes. Besides, the purpose of heating the metal is to "dry" stubborn areas, and not to heat the metal to the point of discoloration/distortion.


- “POR15 Rust Preventative Coating” will not effectively bond to pre-existing coatings, as it’s mainly designed to bond to Zinc Phosphate (chemical bi-product of this etching process which is created on the outside of the metal). Though, once cured, POR15 will not even effectively stick to itself without properly prepping it beforehand (requires sanding the existing cured POR15-coated surface along with the application of this product: POR-15® Self Etch Primer ).

Though, “POR15 Rust Preventative Coating” will definitely bond to concrete (assuming it's clean enough), so protecting your driveway/garage floor would be smart before applying the coating on a vehicle sitting on top of it (unless your goal is to coat both at the same time ;-)
 
Last edited:
I have a 1999 Jeep Wrangler TJ which has rust on the frame center section that needs to be repaired on the passenger side any maybe the drivers side. Can you do this for us? Is there any way to have you get a look at the vehicle? We live in Muncie, IN.

Looking forward to hearing from you!

Mike
 
Back
Top