Weber 32 36 dgev carburator

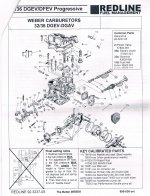
Believe it or not, the fact that it wants to fire up after pumping the pedal is a good thing. When you pump the gas pedal, it is forcing fuel into the ventrui’s , so we have a clog or restriction somewhere on the low speed (idle) circuit. I’m a little curious when you say “I have adjusted/set the idle mixture screws (one on each side)”? Maybe you where turning the idling jet holders(#35 in link 1)? There is one on each side, but the idle adjustments are only on one side? Regardless, the link below is the schematic for the carb. We would be turning number 58 (idle mixture) and 62 (idle speed). It’s a confusing drawing, but hey I have a manual that is not even in English. FYI, some of those parts you will not have.

At this point, I would recommend rebuilding the carb. You could try to disassemble and clean it, but some gasket or ring somewhere will tear (always does!) and you’ll just be waiting on parts. The kit is available in a couple of places (your local auto parts store is not likely to have it). I deal with (link#2) Carbs Unlimited, you may find the kit for less but these folks have support if you need it. Regardless, get the kit with the power valve (cu-32K).

Rebuilding the carb is not overly complicated (even though the schematic has like a billon parts on it), take your time during disassembly and take plenty of photo’s (especially of your linkage as you take it apart). The hardest thing you’re going to do is re-set the float and we’ll do it together. If you’re so inclined, this is a great time to clean the outside of the carb as well. Brake cleaner works great, especially with an old tooth brush.

1. Weber 32/36 DGEV DGAV Diagram


2. Rebuild Kits Weber DGEV Carburetors - Carbs Unlimited
 
Ok...i got the kit you recommended from Carbs Unlimited and there are no directions what-so-ever. I feel pretty confident I can take it a part, clean it with brake cleaner as you suggested, and put it back together. However, I don't know if there are any "special" tricks That i should know before i start...like don't over tighten something, or make sure to clean this or be careful with this, etc. You did mention something about the floats so...if you don't mind tell me anything I need to know before I start so I don't screw something up! Also wonder what's in the kit that's going to make this (carb) work...doesn't seem like much. Oh we'll gotta do something...right!
Thank you!
 

The carb kit it self is not going to fix the problem, however you will likely rip or wear a gasket or o-ring along the way. So, first remove the carb from the engine (the base bolts are meteric and a pain the butt to get to). Undo the linkage rod at the vertial point (ball) and leave the remaining (horizontial) linkage in tact. You are going to basiclly remove the cover plate (top plate) of the carb and clean all the jets and orifices out. You will need to disconnect the choke linkage at the top of the carb by removing that small c-clip.


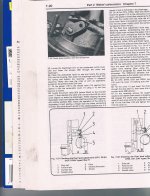
I'm at home today and have attached two diagrams to help with the float adjustments. We are going to refer to the part numbers on these diagrams rather than the numbers on others (the numbers vary depending on who printed it). You may as well replace the parts in your kit as you go. There is no need to fully remove the throttle shafts(22 and 23) or other linkage (58-72). I don't recommend removing the choke assm. from the carb body either (42). These items will require calibration once re-installed after being fully removed.

You want to remove and inspect the main/primary jets (16), the E-tubes (77), the primary and secondary idle jet (32). These you will want to clean out the orfices with a small piece of wire or some thing like that. Look into the carb body as well to make certain their seats are clear too. If you have compressed air available, this helps greatly. Also check the built in filter (6) in clean. The needle valve and seat for the float (11) you are just going to replace with the parts in your kit.


During re-assm. you will want to check your float level and adjust if needed. There are many ways of doing this, but since this is not a race car or rock crawler, we will use the simpler methods. There are two simple ways to do this, both are shown on the bottom of the 1st diagram I sent, dis-regard the "X" there the drawing. You can measure the distance from the inside lip of the top of the carb w/gasket install (hold it as shown in the drawing) to the top of the plastic float. It should be around 18mm. You simply bend "A" in the drawing to achieve this, don't just bend the float up or down! The other way which I perfer is the method with the "X" through it. You would measure from the inside of the carb lip w/gasket to the bottom of the float while holding the unit vertically (as shown) and look for 40mm. Next you would invert the unit so it is horizontal and measusure it again after the float drops, 50mm. This method accounts for float travel, but may require adjustments to points A and R by bending to get the correct travel.


Best of luck....... And you may want to replace your external fuel filter as well.
 
Sorry, it would not let me upload earlier......

Float level 2.JPG


Float level 1.JPG
 
Alright, I've installed the carb kit and got it running again and it's actually running really good! Thank you so much for all your help and instructions; the diagrams helped tremendously. You mentioned earlier that some of the plumbing was wrong or could use some modifying, I have it set up the same way it was/is in the pictures. While it is currently running very good I would like to make sure I have everything installed and set up the "way it should be" so, if you don't mind helping me some more I would appreciate your advise as too how to make sure I have everything the way it should be. Thanks again! Btw, the floats were way off, from what the diagram shows for proper setting (10mm of travel) and when I removed the carb I noticed a couple of cracks in the adapter plate so, I replaced them as we'll.
 

Alright!.......I’m happy that things are normal or getting close to it. There is another link I’m going to send you for the procedure of “Best Tuning Practice”. It will help get the baseline for your carb and a good operating idle adjustment; I just need to find it?(Found them, see below)

To install a Weber downdraft carb, there are a few things that are recommended (and time tested) from the manufacturer. First is the reduction of your incoming fuel pressure to 3-4.5 psi to the carb inlet. This can be easy as simply adding a pressure regulator on the inlet fuel line and a “tee” with a psi gauge after it. Over the years I have used many types from Mr. Gasket to Spector to Weber (high dollar!) and have been the most pleased with Holley. Consider that you have a fuel return line that is plumbed into the existing fuel system which can be an obstacle for a constant fuel flow at a steady pressure of 3-4.5 psi (which is what the Weber needs to achieve maximum performance and economy). A simple fix is the regulator/gauge mentioned above with the removal (capping) of the return line. For the money, effort, time and performance, I have found using a Holley regulator (12-803BP) which also will allows a return line to the tank works the best and causes less stress on the fuel pump. Not only is it a regulator, but it serves a pressure return valve (PRV). In essence, it allows the excess fuel to return to the tank while reducing the pressure (see photo below).

You could simply install this in place of your current fuel filter which already has a single inlet and dual outlets and just install a single in and out filter (plus your gauge) on the direct line to the carb inlet after the regulator. This will get you a filtered, steady regulated supply of fuel.

The ultimate upgrade would include the above mentioned regulator with an electric fuel pump, but it’s not completely necessary especially if we are using our Jeep as a Daily Driver or weekend cruiser. However, if you’re planning on off-roading or extreme conditions, the electric pump is the way to go. I’m planning on doing a “how to” posting on the installation of an electric pump in the future (but it is dependent on getting to that stage of my current restore project). If you want to go this route right away, just PM me for diagrams and part numbers.

Keep in touch.......Happy Jeep’in!
John C.

Try these links as well:
http://www.redlineweber.com/html/Tech/carburetor_set_up_and_lean_best_.htm

http://www.classicinlines.com/WeberDGV.asp - this site is more geared towards Ford inlines, but the info, especially about the Weber, is great!


Last edited:
Good afternoon guys, and happy Jeeping.
Most of us with webers have some sort of " War Stories" but usually find it was because we either trusted someone else to set it up, or weren't paying attention. I have a question for the Gurus...! My weber is fairly new on an '83. It runs great but is a bugger to start after sitting. I discovered it didn't have any fuel in the bowl. I removed the fuel and canister hoses and capped the carb. Took off the clip from hell and poured fuel from a can into the bowl and sat the top back on. The jeep was cold while doing this. the next morning I had lost almost 2/3 of the fuel. Took the power valve out and checked for the gasket and it was fine. floats are fine. It's a bear to start but runs sweet once warmed up. where's the darn fuel going. Weber says I need to buy bigger jets to close the b-fly. I'm a retired Elec. Eng. and not a carb Dr. but unless this carb has changed into a EFI vacuum is needed to pull gas from the bowl and no matter where the fly was set, gas can't run out....or can it? My next step it to remove the carb. build some legs with bolts and watch for gas unless one of you experts can tell me another reason for the mysterious gas absence. Thanks for the help. also I do have a reg but am using the old style filter with the by pass and a mechanical F/P. Mark
 
mark, You should probably make this it's own thread if you know how. To the ques, I have heard of this on hot rod wed sites with 4 barrel carbs but cant remember the cause. Fuel is seeping past something, maybe needle and seats. You could try a rebuild. Others may have a better answer for you soon. good luck
 

So this is a similar problem to the one describe in CJ/YJ/JK section: 88 YJ Fuel Pump Issue. Kudos Mark for your trouble shooting efforts, not many folks go to that extreme! There are a couple of things that come to mind. I’d be inclined to follow 69jeepCJ’s advice of a rebuild kit, if for nothing else because you have removed the top cover and should replace the paper gasket. It’s not likely that you are siphoning into the venturi’s, but it could happen. As for 2/3 of the fuel disappearing, consider if the carb were dry prior to the trouble shooting, atmospheric pressure will refill all the circuits, E-tubes, capillaries, etc. as it sits (and Webers have an over abundance of passages). Just a thought.
While rebuilding my carb, I would reset my float level, remove and clean the E-tubes (most people overlook this because the parts are not in the rebuild kit) and set the idle adjustment (see the scanned figures previously on this posting).
As for Webers consult, are you calling Weber direct or a re-seller? That just doesn’t sound right at all? I been using various Webers for years and never heard of that, but you never know. The venturi’s throttle plates are not governed by the jets? The 32/36 is a mechanical linkage design which in turn determines when the each jet will open……. Maybe they misunderstood the problem? Which leads me to your other problem of hard starting. Sounds like you need to check/reset your choke linkage and set the fast idle. You may need to adjust your primary idles screw as well. For a cold start test, fully depress the gas pedal with the engine off and use a block of wood, rubber band or whatever works manually holding open the choke plate. If you look down inside, the throttle plate should be fully closed. If they are open (even just a little) you’ll have a crappie start up/warming period.

Hope this helps?
 
Good job getting the weber. I swapped it on my old yj years ago and it made a world of difference. Not sure where your at with it but you'll be happy you got one when you get it tuned. Add some headers, a free flow exhaust, an hei ignition and that thing will set you free man. Have fun.
 
Back
Top